Saturday, February 22, 2014

Lighthouse

I'm part of a lovely group of miniaturists called Swap Shop. Fern brought up an idea of making a lighthouse (inspired by this Pinterest board) and I jumped at the chance to make something. I decided not to worry about a specific scale, since sometimes I get a little overwhelmed by that.

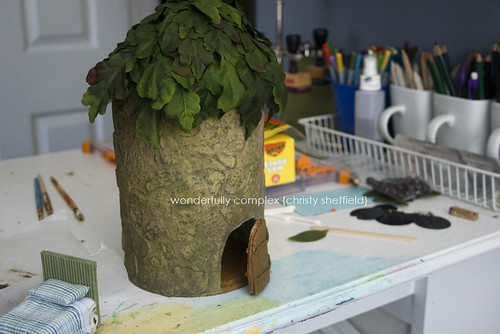
My idea was to have a lighthouse that was old and abandoned. It was no longer loved and was beginning to fall apart. Here's how it turned out:


I photographed it by the hub's boat. (Sidenote: I love the color of his boat!) This was a lot of fun. I used a baby formula can to make the lighthouse. I knew saving those would come in handy.


This was my first time landscaping anything miniature. I used supplies from the diorama hobby aisle. I started with a diorama kit from Scene A Rama that I got half off using a coupon. I initially was going to do a water scene, so I picked up the water kit, but I ended up using only the rocks, fine turf, and glue from the kit. 


I also used supplies from Woodland Scenics, which is the parent company of Scene A Rama. They are aimed towards the hobbyist, particularly those that make railroads and other similar scenes, whereas Scene A Rama is aimed towards school children who need to do a diorama for an assignment. 

Woodland Scenics has a much larger choice of colors. I felt the green that came with the diorama kit was a little too unnatural, like the green crayon in the crayon box. So, I used burnt grass fine turf and earth fine turf to give a more natural look. I also used buff ballast to create a pathway.


I watched a ton of videos on YouTube, both from Woodland Scenics and Scene A Rama. I could spend hours watching videos of others making miniatures. There are a lot of talented folks out there!

So, here's a few of the work in progress shots, so you can see how far this gem came! These were taken with my phone, so I apologize that the shots aren't super close.


I trimmed down the formula can. I had this vision in my head of showing the lighthouse situated on some rocks, so I used a jewelry box to add height. All of this is on the base of the formula can.


Next, I used a combination of molding paste and a coarse, white glitter that had no sparkle to it to create the texture.


I used a combination of brown, black, burnt umber, and other colors to create a dirty wash of color. I wanted my lighthouse to look old and abandoned.


I used more molding paste that I tinted a sandy color and mixed with glitter to act as a base for the rocks. At this point I wasn't sure exactly how I wanted to do the rocks, so I worked on the greenery. I found small trees that I used to surround the lighthouse. My idea was that the lighthouse was abandoned and no longer in working order, so the terrain was starting to grow up around it.

I forgot to take any pictures of the lighthouse after this point, but I used small round sticks (similar to toothpicks but larger - found in the wood section) and leftover packaging to create the top of the lighthouse. This portion took the longest because I couldn't exactly get my vision to come to life. I finally decided to give up trying to be perfect. After all, the lighthouse was supposed to look like it was aging poorly, so if things were uneven it would be okay.

Anyway, I hope you like it! It was a lot of fun!


Thursday, June 27, 2013

Review: Thailandhandcraft Station Ebay Store

I pretty much used my June allowance to buy miniatures! I found another store on Ebay called Thailandhandcraft Station. You guessed it...it's in Thailand. They had a great price on dinnerware and serving trays, which I desperately need.

Goodies from Thailandhand Crafts 

First of all, can I just say that I'm a sucker for packaging from other countries. I'm not sure what it is, but I love seeing the postage. And, this one was tied up in string. Are you singing the song from A Sound of Music yet?

Goodies from Thailandhand Crafts 

I purchased a set of six serving trays, a set of two cake stands, and a tin of cookies.

Goodies from Thailandhand Crafts 

Goodies from Thailandhand Crafts

I envisioned the trays to be utilized in my bakery for cookies and cupcakes. Here's my serving pieces with some of my Baked Goods Swap items.

The shipping took a little longer, of course, than it would have from a store within the states. But, considering the stuff came from Thailand, the shipping time was not bad at all. The seller was quick to communicate with me. I forgot to mention which tin of cookies I wanted (the listing had nine different choices), and the seller was quick to amend that by emailing me to find out what I wanted. 

I was impressed with the selection and the prices, and will definitely be ordering from them again.

Tuesday, June 25, 2013

Review: Manor House Miniatures Ebay Store

I recently purchased some cakes for my miniature bakery from an Ebay store called Manor House Miniatures.

Goodies from Manor House Miniatures (mini cakes) 

Goodies from Manor House Miniatures (mini cakes) 

Goodies from Manor House Miniatures (mini cakes)

The price was fairly reasonable. The three cakes I purchased were on sale. And, the shipping was amazing. I ordered the cakes on a Saturday and received them the following Tuesday even though the estimated shipping date was Thursday. Hey, two days early...I'm not complaining! Everything was packaged well, and there were no broken pieces.

I will definitely order from them again. If you are in need of items for your miniature needs, I highly recommend them.

Friday, June 21, 2013

Gnome Dollhouse Update

I realized I never posted pics of my Gnome Dollhouse that I made out of a formula can. I am super proud of how this turned out. I still have a few details to add, but here's what I have so far.

Edited to add: Actually, I've done more work than this but apparently I haven't taken any new pictures. Adding that to my To Do list and will post asap.

  WIP: Gnome Dollhouse

I added leaves for a roof and a door that opens. I still have to make some kind of closure for the door because it won't stay open on its own. I also plan on adding vines or moss to the stone.

WIP: Gnome Dollhouse

Here is a close up of the door. I glued toothpicks to the door. I had some rope looking yellow ribbon that I glued on top of the toothpicks. I then painted the entire door one color.

WIP: Gnome Dollhouse

Here is the entire. I used actual sticks from my yard to make the ladder. I made wooden planks out of Popsicle sticks. The dollhouse is two story. The top floor will be the bedroom and the bottom door is a tiny kitchen and dining room. I've already made a built-in kitchen and a table, but those aren't in the picture.

WIP: Gnome Dollhouse 

Here's a close up of the bed. It's not a working bed. Everything is glued down. I made the quilt out of one of my husband's shirts that had gotten a huge stain on it. The stripes were close enough together to work for a mini quilt. I used a piece of lace for the bed skirt. And, toothpicks were used to make the headboard.

WIP: Gnome Dollhouse 

Here is a close up of the ceiling. I wanted the look of planks, so I used dowel rods to mimic that look.

WIP: Gnome Dollhouse

And, another close up of the bed and bedside table.

I'll try to post some new pictures soon!


Wednesday, June 12, 2013

More Cakes

Handmade cakes

In anticipation for my baked goods swap coming in the mail, I practiced making more cakes. I wish I had made these for the swap instead because I think they are better than the coconut caramel cake. Oh well, gotta keep practicing.

 Miniature Cake

I saw a YouTube video where the author pushed clay through a icing tip. I must not have followed the directions correctly because it was a PAIN IN THE BUTT! I made it work, but I definitely need to go back and research that some more.

Miniature Cake

I made the fondant way too thick. Also, I was not planning on cutting this one open, so I didn't bother mixing the green clay all the way or putting layers of icing between each cake layer. I realized my mistake after I had cut, so I just worked with it.

Three Tier Chocolate Cake

I'm super happy with how this one turned out!The flowers are cute, and the leaves look pretty nice. Now all I need to do is gloss these. Since I knew I was making a tiered cake, I used junk clay. What I mean by this is sometimes I have clay that gets messed up while making things (for instance, white clay that gets dirty). I collect this clay and keep it in a baggie for trying out things or using under fondant since nobody will see it. I also am super paranoid about pieces falling apart, so I used a wire and some TLS to keep the tiers together.

I'm really having fun making cakes. I need to work on not having so many fingerprints on my work though. I guess you could say that's my autograph!

Tuesday, June 11, 2013

Swap Shoppe Group: Baked Goods Swap {June 2013}

I am blessed to be part of a wonderful miniatures swap group. Each month we have swaps we can sign up for. I am learning so much through this group (my number one lesson being not to procrastinate!). I signed up to be a part of the baked goods swap, and I'm so glad I did. These are some talented ladies and I love all the goodies I received.

I made a coconut caramel cake. So, this was only my second attempt at making miniature cakes. I loved the texturing for the inside of the cake, but I'm not super thrilled with my coconut icing. I definitely need to work on that!


Swap Shoppe Group: Baked Goods Swap {June 2013}

Swap Shoppe Group: Baked Goods Swap {June 2013}

Now onto all the goodies I received...

Swap Shoppe Group: Baked Goods Swap {June 2013}

Swap Shoppe Group: Baked Goods Swap {June 2013}

Swap Shoppe Group: Baked Goods Swap {June 2013}

First up are some adorable minis by Shelia B. I love the butter pecan cake (and such a creative way to make a stand). The cookies look yummy! And, I can't wait to to use the fruit slices.

Swap Shoppe Group: Baked Goods Swap {June 2013}

Swap Shoppe Group: Baked Goods Swap {June 2013}

Swap Shoppe Group: Baked Goods Swap {June 2013}

Swap Shoppe Group: Baked Goods Swap {June 2013}

Next are some minis by Bonnie W. I love them! I would have never thought to use cane slices of things like flowers and chicks on a cake, but they are perfect. Can't wait to try this.


Swap Shoppe Group: Baked Goods Swap {June 2013} 

Swap Shoppe Group: Baked Goods Swap {June 2013}

And aren't these cookies from Shirley P. simply scrumptious looking? I would love a real one right now!

Swap Shoppe Group: Baked Goods Swap {June 2013}

Swap Shoppe Group: Baked Goods Swap {June 2013}

I love these colorful macarons from Bekah R!

Swap Shoppe Group: Baked Goods Swap {June 2013}

Swap Shoppe Group: Baked Goods Swap {June 2013}

Swap Shoppe Group: Baked Goods Swap {June 2013}

Swap Shoppe Group: Baked Goods Swap {June 2013}

Oooooh, these chocolate cakes from Diane B. are divine! I absolutely adore the flowers on top. I can only imagine how much time those took!

Swap Shoppe Group: Baked Goods Swap {June 2013}

Swap Shoppe Group: Baked Goods Swap {June 2013}

And, how cute is this tin of cookies from Dragonicelady? (Sorry, I don't know your first name.)

Swap Shoppe Group: Baked Goods Swap {June 2013}

Swap Shoppe Group: Baked Goods Swap {June 2013}

I love love love these little gingerbread boys and girls by Barbara M!

Swap Shoppe Group: Baked Goods Swap {June 2013}

Swap Shoppe Group: Baked Goods Swap {June 2013}

Swap Shoppe Group: Baked Goods Swap {June 2013} 

Swap Shoppe Group: Baked Goods Swap {June 2013}

Wowza, Alicia P. sent a ton of stuff! They all look so yummy! And, I love the box!

Swap Shoppe Group: Baked Goods Swap {June 2013} 

Swap Shoppe Group: Baked Goods Swap {June 2013}

And, Barb K. never ceases to amaze me with her talent. This fruit cake is absolutely gorgeous!
Thanks, ladies, for all the awesome goodies. I feel horrible because mine looks so pitiful in comparison! Now I gotta get some display cases for my bakery so I can showcase these amazing creations!